I hope you all are having a wonderful Easter! Enjoy the moment with family and friends. And, someone, please eat some good home cooked food for me!
Miranda
Sunday, March 31, 2013
Saturday, March 30, 2013
Hospital Day 2
Well, the yesterday was very busy for me. I was admitted into the hospital 2 nights ago because off the issues I have been having with passing out, headaches, pain, and dizziness. The first night there, I guess I passed out on them, and I really haven't stopped having tests done since. That first night was a CT scan of my head. The next day, yesterday, was an eeg, echocardiogram, MRI of the head, and tons of blood work. Something else may have also been in the mix, but I honestly don't remember. So, today I have more blood work done, and am started on a beta blocker to help control my BP and heart rate. I guess my heart rate had been periodically elevated and BP has been high. All I have to say is STRESS. Today I guess I am to have a spinal tap done. But do you want to know what the worst part of it is? The fact that I can't take a shower. They have me hooked up to a heart monitor and I can't take that into the shower. My hair feels like it has cement in it from the EEG goop and talk a bout a frizz/fro. I just want to get to the bottom of this soon! I tried to take a picture of the hair, but you really can't tell much.
 Hope you all are having a better day than me!
Miranda

Miranda
Friday, March 29, 2013
Crafting Hault
I just wanted to let everyone know that I will be out of commission for a few days. With all the issues I have been having lately, my doctor felt it best that I go to the hospital for a full work up. I have no idea how long I will be here, but as soon as I get home and can be up and crafting again, I will be back up and running to whatever extent I can.
Miranda
Miranda
Thursday, March 28, 2013
Butterfly Card
Well, I think my creativity is drying up, or maybe I am just in a funk. Usually, I can come up with a card in no time, this time it took me almost 24 hours to come up with something. This card is for the challenge at Flutter By Wednesday's. The challenge was to use blue, green, and yellow, and of course a butterfly or fairy. Here is what I have made:
 This is a 5x5 card. The papers are from recollections. The flower is hand made. I really do think it turned out pretty cute. The sentiment says, "It's the little things that make life Big."
Hope you like it! Have a wonderful day!
Miranda

Hope you like it! Have a wonderful day!
Miranda
Wednesday, March 27, 2013
Hope
This week's challenge at CASology is  . I was also cruising the net and stopped by Stamp TV. They are doing a blog hop also with a CAS card but you can only embellish with things that sparkle. So I decided to combine the two challenges. This is my rendition:

 The green ribbon represents Bi-Polar disorder. I have a family member who have been diagnosed with Bi-Polar disorder and would love to find a way to erase the stigma of mental illness. So, my hope is that someday, there will be a cure. The disease is manageable, but wouldn't be great if it could be eradicated all together?
I have some other projects in mind for today, but I am in quite a bit of pain, so I may or may not be able to work on them. If I am up to it, I will see you later on today, if not, most likely tomorrow.
Please feel free to ask questions, leave comments, suggestions, etc.
Miranda
 . I was also cruising the net and stopped by Stamp TV. They are doing a blog hop also with a CAS card but you can only embellish with things that sparkle. So I decided to combine the two challenges. This is my rendition:

I have some other projects in mind for today, but I am in quite a bit of pain, so I may or may not be able to work on them. If I am up to it, I will see you later on today, if not, most likely tomorrow.
Please feel free to ask questions, leave comments, suggestions, etc.
Miranda
Tuesday, March 26, 2013
2 Cards for 3 Challenges
I am back! And I have 2 cards to share with you. I will be entering these in a couple challenges.
 The above card will be entered into the challenge at I (heart) sketches and is based on this sketch

The brown paper is early espresso from Stampin' Up. The red paper is recollections. The cream paper is Very Vanilla from Stampin' Up. The 2 red squares were run through the embosser with the Cuttlebug Swiss Dots die. The phone booth stamp is from the Stampin' Up Feeling Sentimental set. The phone receiver was cut out on the Cricut from the From My Kitchen cartridge. I used gold floral wire that I wrapped around a pencil and used to form the semi circle seen on the sketch. The two vertical polka dotted lines are fabric tape.
I knew when I got the Feeling Sentimental stamp set that I wanted to use the phone booth with the sentiment spread the word, but had not idea what to do with it. When I saw the sketch, the stamp immediately came to mind because the semi-circle in the sketch reminded me of a phone cord for whatever reason.
This next card will be entered into 2 challenges: 1) Die Cuttin' Divas and 2) Bitten by the Bug2.

The challenge at Bitten by the Bug 2 is to use any card feature. I used the card function from beyond birthdays for this. The egg is from Create A Critter 2, the flower tail is from 3 Birds on Parade, the circles and ovals are cut from Cricut Craft Room Basics.
The challenge from Die Cuttin Divas is embossing with ribbon.
 This picture shows the wood grain embossing on the brown "tree" trunk. I also embossed the pads of the bunny's feet with Swiss Dots, but then covered the dots with pink glitter glue. I decided to tie a bow around the Easter egg. Then stuck a pink flat back pearl on the bunny's tail. This card was inspired by a card made at a Stampin' Up card camp I attended this past weekend. All papers used were from recollections except for the Easter Egg, it is from DCWV.
Please feel to ask questions, leave comments, etc.
Have a great night!
Miranda

The brown paper is early espresso from Stampin' Up. The red paper is recollections. The cream paper is Very Vanilla from Stampin' Up. The 2 red squares were run through the embosser with the Cuttlebug Swiss Dots die. The phone booth stamp is from the Stampin' Up Feeling Sentimental set. The phone receiver was cut out on the Cricut from the From My Kitchen cartridge. I used gold floral wire that I wrapped around a pencil and used to form the semi circle seen on the sketch. The two vertical polka dotted lines are fabric tape.
I knew when I got the Feeling Sentimental stamp set that I wanted to use the phone booth with the sentiment spread the word, but had not idea what to do with it. When I saw the sketch, the stamp immediately came to mind because the semi-circle in the sketch reminded me of a phone cord for whatever reason.
This next card will be entered into 2 challenges: 1) Die Cuttin' Divas and 2) Bitten by the Bug2.

The challenge at Bitten by the Bug 2 is to use any card feature. I used the card function from beyond birthdays for this. The egg is from Create A Critter 2, the flower tail is from 3 Birds on Parade, the circles and ovals are cut from Cricut Craft Room Basics.
The challenge from Die Cuttin Divas is embossing with ribbon.

Please feel to ask questions, leave comments, etc.
Have a great night!
Miranda
2 more Mini-Album Pages
Hey everyone! Sorry I didn't get back with you yesterday. By the time I got finished with my errands, the pain and exhaustion weren't going to let me do anything except sleep. But, I have been busy, well, as busy as I can be without hurting.
I have finished 2 more pages in the accordion fold mini-album and have started another card. The card will be posted once I am finished with it. So, here are several pictures of the mini-album pages:
 The above picture is of the last 2 pages. The top of the 3rd page I cut out of a notepad I had in my stash and stamped with a frame in early espresso ink from Stampin' up.
 This is a picture of the bottom of the 3rd page. The rose, butterflies, and the word beautiful are rub ons from Ruby Rock It the Avalon collection. Dreams come a size too big so we can grow into them is also from Stampin' Up and stamped in early espresso.
 This is an interactive mini page if you will. I followed a tutorial I found on YouTube by Kathy Orta. She is amazing and has many awesome tutorials related to mini albums. She also has kits for sale should you decide you would like to try some of the things she has in the store at Paper Phenomenon. The pink flower is not only decorative, but also serves to help wrangle the page and a half tag that is slipped into the side pocket.
 This is the inside of the tag that on the front of the "mini" page. All stamps are from Stampin' Up.
 This is the back side of the tag.
 The matting that is seen when tag is removed.
 Mini page unfolded once.
 Mini page unfolded twice

Mini page completely unfolded.
This mini album is far from complete, but I will keep everyone updated as I get further along.
Please feel free to ask questions, leave comments, etc.
I will post the card once I have completed it.
Miranda
I have finished 2 more pages in the accordion fold mini-album and have started another card. The card will be posted once I am finished with it. So, here are several pictures of the mini-album pages:


Mini page completely unfolded.
This mini album is far from complete, but I will keep everyone updated as I get further along.
Please feel free to ask questions, leave comments, etc.
I will post the card once I have completed it.
Miranda
Monday, March 25, 2013
Which Way to Easter Fun?
Happy Monday! I trust everyone had a good weekend. We have snow and it's almost Easter. I think Mother Nature is having a senile moment. Anyway, I actually have 2 things today.
First, I will show you the card I have created for the challenge at FCCB. The challenge is to use anything Easter on a project. This card was cut from the Cricut but uses elements from several different cartridges, non of which are Easter related.
.JPG) The tree is just a scrap of brown paper that I embossed with a wood grain embossing folder and went over the knot with a brown sharpie.
The tree is just a scrap of brown paper that I embossed with a wood grain embossing folder and went over the knot with a brown sharpie.
The leaves were cut from green scraps with decorative scissors. The arrows were printed off the computer, cut out and embellished with stickers I have had for umpteen million years. The clouds were sponges with Stampin' Up ink Ballet Blue and a scallop oval. The grass is a border from the roses and rosettes cartridge. The signs and the front ground leaves have been popped up with foam mounting tape.
.JPG)
.JPG)
Now, for the animals. The chick is simply a circle and 2 ovals welded together. The eyes were punched out with a small whole punch. The beak is a triangle and the feet are a flower also from the ribbons and rosettes cartridge. all backed on black paper.
The bunny is also a series of circle and ovals welded together. Again, eyes punched with small whole punch. The ears and face are drawn on with pink marker.
I will post the second project later today. I have some errands I need to run first.
Hope you like! Feel free to leave comments or suggestions!
Miranda
First, I will show you the card I have created for the challenge at FCCB. The challenge is to use anything Easter on a project. This card was cut from the Cricut but uses elements from several different cartridges, non of which are Easter related.
.JPG)
The leaves were cut from green scraps with decorative scissors. The arrows were printed off the computer, cut out and embellished with stickers I have had for umpteen million years. The clouds were sponges with Stampin' Up ink Ballet Blue and a scallop oval. The grass is a border from the roses and rosettes cartridge. The signs and the front ground leaves have been popped up with foam mounting tape.
.JPG)
.JPG)
Now, for the animals. The chick is simply a circle and 2 ovals welded together. The eyes were punched out with a small whole punch. The beak is a triangle and the feet are a flower also from the ribbons and rosettes cartridge. all backed on black paper.
The bunny is also a series of circle and ovals welded together. Again, eyes punched with small whole punch. The ears and face are drawn on with pink marker.
I will post the second project later today. I have some errands I need to run first.
Hope you like! Feel free to leave comments or suggestions!
Miranda
Sunday, March 24, 2013
Grunge Note Card
Sorry I didn't get a chance to post yesterday. I went to my mom's and by the time I got home, I was exhausted and in pain. But, I did have a chance to check out the Saturday challenges that I like to participate in. The DT at My Time to Craft! posted a challenge of Gothic. HUH? Really? Then I read a little further. They went on to explain that anything dark or grungy would work. OK, grunge I can do.
The DT at Retro Sketches posted this sketch:

So, bring on the grunge. I love the old grungy look, but haven't really done much with it. So, between the two challenges, this is what I have come up with. I'm sure that the team at My Time to Craft really wanted something more dark, but I just can't get into the goth thing.
 This is a 5x7 card. I first found a paper in a new DCWV stack that I picked up at Michael's today. The stack is called The Four Seasons. I cut out the parts I likes the best and pasted them down on the card. Then I tea stained a dictionary page and grunged it up. The paper flowers in the lower right hand corner were hand made. I ripped the upper left corner and rolled the rips back and tucked in a metal flower that had been grunged up with gesso and spritzed with my home made tea glimmer mist. I ripped a cream piece of card stock and inked the edges. I did the same with the blue but added some stamping from stampin up. I then made the banner, grunged it up, adhered it to a Prima engravers chip board piece. It was then adhered to a handmade burlap fringe flower. The butterfly was cut from the page from the DCWV stack. Here are some closer looks:


I don't think it's too bad for my first attempt at grunge. What do you think?
C&C welcome!
Miranda
The DT at Retro Sketches posted this sketch:

So, bring on the grunge. I love the old grungy look, but haven't really done much with it. So, between the two challenges, this is what I have come up with. I'm sure that the team at My Time to Craft really wanted something more dark, but I just can't get into the goth thing.


I don't think it's too bad for my first attempt at grunge. What do you think?
C&C welcome!
Miranda
Friday, March 22, 2013
Manly Thanks
I fell asleep early last night, so now I am up before the chickens. I don't think anyone should be awake before dawn. But, because my mind was racing, I came up with another card based on a sketch at I (heart) card sketches

Here is my interpretation:
 It is pretty close to the sketch, but I wanted something a little different, So I made the card open a bit differently than expected.
 This entire card was made from scraps in my over flowing scrap box except for the clock and 3 small circles. They are self adhesive chip board from the Prima Engraver Collection. The stamp is from Stamin' Up Vintage Sentiments and is stamped in Early Espresso I think it's called. I hope you enjoy.
Thanks
Miranda
Here is my interpretation:


Thanks
Miranda
Thursday, March 21, 2013
Song
Yeah, I know, I just posted a few minutes ago, but you know how it is when the creative juices are flowing. I was going click happy on a craft site and I ended up on the Casology. They have a challenge going on. It is not a sketch type challenge, it is simply a word:

As I love music, it only took me a few seconds come up with this:
 You know you are getting old, when the music you grew up with is now being played on the "Oldies" station. And since the song came out in 1985, I felt it only appropriate to "antique" it a bit.
Paper: DCWV A Type of Art
Sentiment: Printed off computer with Bryon Mark I font via Microsoft Publisher
Ink: Vintage Photo Distress Ink and Black Staz On
Stamp: Stampin Up Feeling Sentimental
After cutting the paper down to size, I went into Microsoft Publisher and found what I thought was the perfect font. Word Art allowed me to wrap the text into a circle. I then printed out the sentiment. And yes, the words in the background are upside down. I figured if you were spinning around it really wouldn't matter which way the words were facing (LOL) and thought upside down might be a appropriate.
Next I added the Stamp. I inked the unicycle really well with Vintage Photo and then just kind of randomly dabbed on some black Staz On. I wasn't sure if I would like the effect, but I think it made the stamp looked more aged than just plain brown ink.
I then lightly inked the edges with Vintage Photo. To me it seemed like the paper was still a little bit too new looking so I took a very dry sponge with Vintage Photo on it and rubbed it over the paper.
After that, I grabbed my Diet Mountain Dew (nectar of the caffeine gods) and while I was taking a drink, thought, what would happen if I inked the bottom of my can and stamped the card with it. So, I inked it in Vintage Photo and started stamping. The ink was too shiny so I rubbed some of it off with a paper towel. And Voila! A very simple, yet awesome card!
Who knows, you may even see me post again later. My mind seems to be full of ideas today!
Thanks again!
Miranda

As I love music, it only took me a few seconds come up with this:

Paper: DCWV A Type of Art
Sentiment: Printed off computer with Bryon Mark I font via Microsoft Publisher
Ink: Vintage Photo Distress Ink and Black Staz On
Stamp: Stampin Up Feeling Sentimental
After cutting the paper down to size, I went into Microsoft Publisher and found what I thought was the perfect font. Word Art allowed me to wrap the text into a circle. I then printed out the sentiment. And yes, the words in the background are upside down. I figured if you were spinning around it really wouldn't matter which way the words were facing (LOL) and thought upside down might be a appropriate.
Next I added the Stamp. I inked the unicycle really well with Vintage Photo and then just kind of randomly dabbed on some black Staz On. I wasn't sure if I would like the effect, but I think it made the stamp looked more aged than just plain brown ink.
I then lightly inked the edges with Vintage Photo. To me it seemed like the paper was still a little bit too new looking so I took a very dry sponge with Vintage Photo on it and rubbed it over the paper.
After that, I grabbed my Diet Mountain Dew (nectar of the caffeine gods) and while I was taking a drink, thought, what would happen if I inked the bottom of my can and stamped the card with it. So, I inked it in Vintage Photo and started stamping. The ink was too shiny so I rubbed some of it off with a paper towel. And Voila! A very simple, yet awesome card!
Who knows, you may even see me post again later. My mind seems to be full of ideas today!
Thanks again!
Miranda
A Masculine Card with No Special Tools
Hello again! I hope you all are well. The DT at Cas(e) this Sketch put up a new challenge today:

What does this sketch say to you? To me, it looks like a pocket on a shirt. Immediately it reminded me of the shirts my dad used to wear. The button up ones with the breast pocket. He used his to carry his cigarettes and lighter. He never wore a shirt without a pocket. God forbid he be without his smokes. When he passed, we buried him with a pack of cigarettes in his breast pocket. Too much information? Sorry, took a short trip down memory lane. Thinking about my dad always makes me smile!
Anyway, back on track. Since the card reminded me of a gentleman's shirt, I decided to make a masculine card that looks like one of my dad's shirts. And for a further challenge, I decided to see if I could do it without the help of my Cricut. To do it on the Cricut would have been much easier, as all I would have had to do is pick a cut file and cut. But, not everyone has a Cricut. So I set off to make this:
 It's interactive:
 OK, here's the scoop:

 1. Decide how big you want your card to be. If you want the collar to be a different color than the shirt, adhere a strip of chosen color to the back of the card.
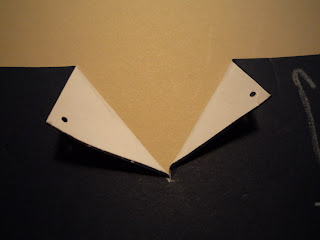
2. Find the center and cut straight down until you feel you have cut enough to make a good collar. Fold the collar back.
 3. Punch holes through the collar and shirt where the buttons should be and use brads to hold the collar down:
 4. Choose a coordinating paper for the tie. On the paper, draw a tie shape and cut it out.

 You can see that I changed my mind on the width of the tie several times.
5. Adhere tie to shirt
 6. Make pocket. I chose to make mine match the shirt, but you can do anything you want with it. I kind of just messed around with it until I was satisfied with the shape and size. If you choose to make the pocket interactive, make sure you do not adhere the top of the pocket to the card and do not glue/tape down the center. Only adhere the very edges.
 I made mine interactive, so I made a small tag that says Dad to put in the pocket.
 Oh, I forgot, because I wanted my pocket to be a little more noticeable, I hand stitched the outer edges of the pocket before I adhered it to the shirt.
7. Now you can adhere the shirt to the front of the card. You will notice that you will be able to see the base card because of the collar. You can leave it that way, add coordinating paper behind the collar, or cut out the triangle where the collar is, which is what I chose to do.

The biggest challenge for me was the tie. It took me a bit to get a shape I was happy with. I just had to keep messing with it, I did add a brad for a tie back sort of thing. After I punched it, I realized it should have been up higher on the tie, but I think it still looks cute.
I hope you find this card as cute as I do. But, then again, I am biased.
Miranda
What does this sketch say to you? To me, it looks like a pocket on a shirt. Immediately it reminded me of the shirts my dad used to wear. The button up ones with the breast pocket. He used his to carry his cigarettes and lighter. He never wore a shirt without a pocket. God forbid he be without his smokes. When he passed, we buried him with a pack of cigarettes in his breast pocket. Too much information? Sorry, took a short trip down memory lane. Thinking about my dad always makes me smile!
Anyway, back on track. Since the card reminded me of a gentleman's shirt, I decided to make a masculine card that looks like one of my dad's shirts. And for a further challenge, I decided to see if I could do it without the help of my Cricut. To do it on the Cricut would have been much easier, as all I would have had to do is pick a cut file and cut. But, not everyone has a Cricut. So I set off to make this:


2. Find the center and cut straight down until you feel you have cut enough to make a good collar. Fold the collar back.


5. Adhere tie to shirt


7. Now you can adhere the shirt to the front of the card. You will notice that you will be able to see the base card because of the collar. You can leave it that way, add coordinating paper behind the collar, or cut out the triangle where the collar is, which is what I chose to do.

The biggest challenge for me was the tie. It took me a bit to get a shape I was happy with. I just had to keep messing with it, I did add a brad for a tie back sort of thing. After I punched it, I realized it should have been up higher on the tie, but I think it still looks cute.
I hope you find this card as cute as I do. But, then again, I am biased.
Miranda
Wednesday, March 20, 2013
Live with Passion
Just another quick card before I end up having to take something stronger than Advil for the pain. The design team at Freshly Made Sketches have posted their challenge sketch for the week:

 The bottom most petals are made from 2 stars that have been off set and adhered together. The round part is a circle that had been cut in toward the middle and the edges have been inked. The stamen is a flower from cut from the home accents Cricut cartridge.


Immediately, I thought about the passion flower that I had been wanting to try. As this is a clean challenge, I thought this was the perfect chance to try. This is what I came up with.


This is the flower I based my rendition on. Pretty close, but still needs some tweaking I think.
Miranda
Bunny, Egg, Butterfly, Sketch
Hello again! Hope all is well. I know, the title of this is a bit strange. That is because I have combined 3 challenges into one very cute card:
 The ladies at Flutter By Wednesday's posted this sketch as part of their challenge and of course you have to incorporate a butterfly or a fairy:
 You can see in the picture my interpretation of the sketch, but the butterflies are a bit more difficult to see. Back some time ago, I wanted a background with butterflies and flowers, but didn't have exactly what I wanted, so I made my own with paper I had on hand and stamps. I had some left over, and because butterflies are springy, I used it here:


The challenge by Die Cuttin Divas was to use a bunny and the challenge by Bitten by the Bug 2, was to use any egg cut from the cricut. So, I decided to have my bunny, cut from the Create a Critter 2 cartridge, hatching out of an Easter egg, also cut from the Create a Critter 2 Cartridge.
The card for this is 4.25" x 11" with the 11" length folded in half of course (from Recollections). The back ground paper is from the DCWV Sweets stack. The stamps are from Stampin up (not sure of the name, sorry), Prima the Lyric Collection, and Inkadinkado Summer Collection.
The scalloped oval is from DCWV Nanna's Kids and the inner Oval is from DCWV Love & Wedding. The rest of the card was made from scraps, so I'm not really sure where they came from, though the plain colors are most likely Recollections while the patterned paper is from DCWV I think.
I am finding that challenges help me out a lot. They kind of get the creative juices flowing.
Anyway, hope all is well with everyone! Have a great Day!
Miranda
Subscribe to:
Posts (Atom)